Here's a short screencast I recorded that shows how to do it...
Showing posts with label video. Show all posts
Showing posts with label video. Show all posts
Friday, January 11, 2019
Showing a selected portion of a video in Slides
A common question is whether you can play just a piece of a video in Google Slides. The answer is yes! Right-click the video and choose Format options. Click on Video Playback and you can then set the Start and End times.
Here's a short screencast I recorded that shows how to do it...
Here's a short screencast I recorded that shows how to do it...


Monday, December 17, 2018
A WeVideo bug and how to resolve it
I've been noticing sereral students encountering an issue when trying to upload media from Google Drive to WeVideo (and have had it myself), After clicking the green "upload media" icon and clicking on the Google Drive icon, rather than seeing their content in Google Drive, they're getting a blank window, like this:

Here's how to deal with this issue. WeVideo gives you the option to upload files from your computer, as well. On a Chromebook, if you choose this option, you will see your folders (both Drive and Downloads) and you can upload from there. On other devices, you will see all local folders, so you will first want to download the files from Google Drive. You can then upload from whatever folder you chose.
So, the whole process is:


Here's how to deal with this issue. WeVideo gives you the option to upload files from your computer, as well. On a Chromebook, if you choose this option, you will see your folders (both Drive and Downloads) and you can upload from there. On other devices, you will see all local folders, so you will first want to download the files from Google Drive. You can then upload from whatever folder you chose.
So, the whole process is:
- Click the second tab to get to your WeVideo media
- Click the green upload icon
- Click BROWSE TO SELECT
- Find the file(s) and upload


Thursday, May 10, 2018
Monday, December 11, 2017
WeVideo help videos
Gary and I were just working with a class using WeVideo. They asked about getting tutorial videos. As much as I enjoy creating those myself, in this case the help videos produced by WeVideo are so good that it's not worth reinventing that particular wheel.
The videos are short and to the point.
Learn how to:

and more.
A reminder that in order to use some of these techniques, you need to get the code from Gary or me, as they are not available to free accounts. We're happy to assist you with any of this!
https://www.wevideo.com/academy
- Trim and Split Clips
- Add Text and Annotations
- Use the Green Screen Effect
- Adjust Audio Levels
and more.
A reminder that in order to use some of these techniques, you need to get the code from Gary or me, as they are not available to free accounts. We're happy to assist you with any of this!
https://www.wevideo.com/academy
Thursday, February 9, 2017
Insert videos from Google Drive into Google Slides
Up until now, Google Slides only allowed YouTube videos. But many of us store videos in Google Drive. You can now insert those videos into Slides. Like so:
Friday, January 15, 2016
WeVideo help site
I've been working with several classes using WeVideo this year so I thought I'd create a single help site with resources and documents. I'll be adding to the site as we continue to use WeVideo.
If you're wondering what the heck I'm talking about, you must check out WeVideo! It's a web-based video editing tool. It's easy to use and you can publish your final product to YouTube, Google Drive, Vimeo, etc.
Here's an example of a video done from my office webcam:
Please check out the help site and let me know if I can help you get started.
If you're wondering what the heck I'm talking about, you must check out WeVideo! It's a web-based video editing tool. It's easy to use and you can publish your final product to YouTube, Google Drive, Vimeo, etc.
Here's an example of a video done from my office webcam:
Please check out the help site and let me know if I can help you get started.
Friday, May 1, 2015
Two recent inspiring class activities
I had the privilege of working with two classes using technology in recent weeks. In both cases, students were using technology in creative and transformative ways. It's always good to share these-- if you're inspired and want to take on something similar, please let me know!

Here's what one student produced:

Geology Volcano Project
Kerry Walker's classes are studying volcanoes. Each student used LucidPress to create an online "brochure" about his/her volcano. Then, the class used a shared Google Map, attached a pin to the location of each volcano, and provided a link to the brochure. Check out the final result here:Current Issues Political Ad Project
Lezlee Sprenger asked her students to create political ads for different candidates. The description and targets are here.Here's what one student produced:
Wednesday, September 17, 2014
Saving WeVideo to Google Drive
WeVideo is a great web-based video editor that connects with Google Drive (here's an earlier post about it). Here are some tips on saving (and sharing) videos you create in Google Drive
- Before starting to use WeVideo, go to Google Drive, click Create, then Connect More Apps. Search for WeVideo and add it.
- You can now start a new video project by going to Google Drive, Create, and choosing WeVideo. As you work on WeVideo projects, the project files will be conveniently saved in Google Drive (see the last pic below).
- When you are ready to share your final product…
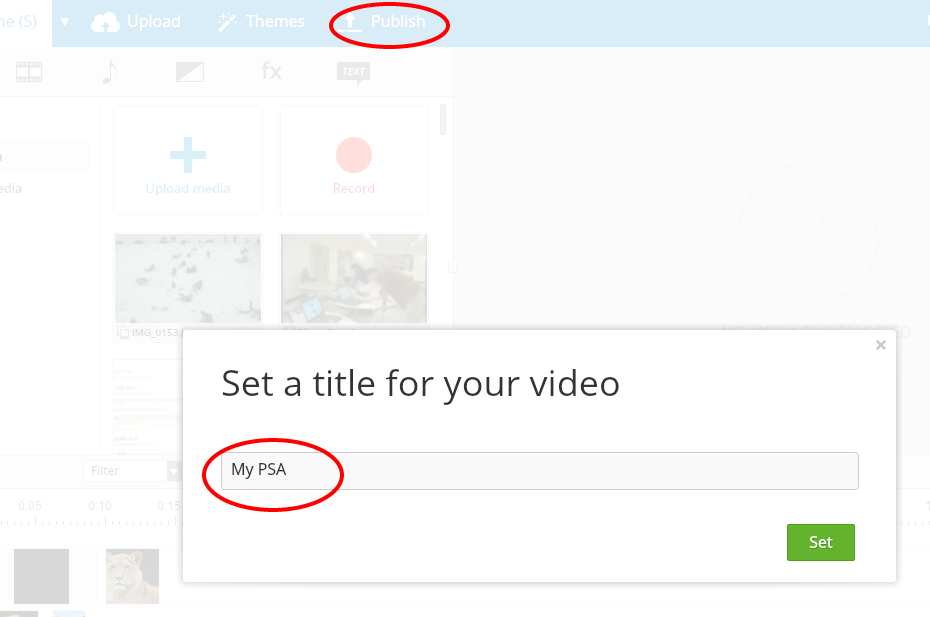
- Click Publish and give it a title.
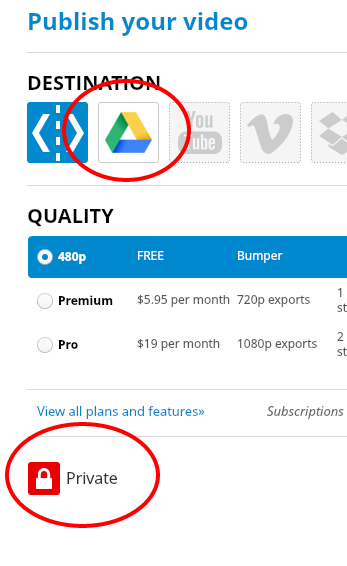
- Click the Google Drive icon. Also, change visibility to private. Publish.
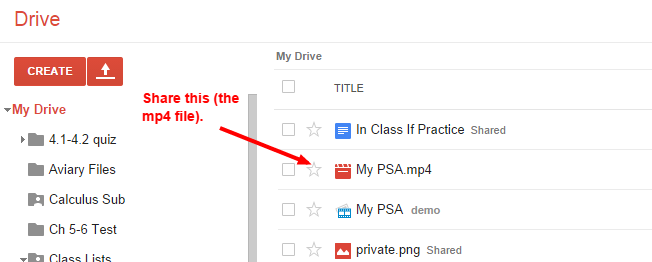
- You will now see the finalized video in your Drive. The format will be mp4. Note that this is different from the project file. Share the video as you would any Google Doc. You will get a URL that you can e-mail, post to Moodle, etc.
Note that you get up to 15 minutes of download time per month. This is usually plenty, but it’s best not to publish until you’re confident that the video is in final form. Note that the other “My PSA” file above (the one that doesn’t say mp4) is the WeVideo project file (that can still be edited).
Friday, September 12, 2014
More ways to get video from your iPhone or iPad to a PC
Using your iOS device to capture video and need it to get it onto a PC* at school? Last year I postedmethod of using Google Drive to do this. I heard back from some students that the process could take a long time.

So, here are some other approaches:
1. Find the USB cable that attaches to your phone or iPad (best if it's the one from Apple) and plug it into your computer. Click Computer in the Start Menu and look for an icon for the device. Right-click on this and choose Import pictures and videos. Note: this method does not always work. If it doesn't, try restarting your device, or using a different cable or USB port.
2. Use a wireless transfer app. I just used WiFi Album (free version) and it worked great.
3. If you don't need to actually save the video on your computer (but just need to share it), you can also simply upload to YouTube. Lots of sites let you then incorporate the video from YouTube. To do this, click the share icon and choose YouTube. Once it's on YouTube, you can edit, as necessary. You can make the video unlisted, but don't set it to private if your intent is to use it on a website or other project.

So, here are some other approaches:
1. Find the USB cable that attaches to your phone or iPad (best if it's the one from Apple) and plug it into your computer. Click Computer in the Start Menu and look for an icon for the device. Right-click on this and choose Import pictures and videos. Note: this method does not always work. If it doesn't, try restarting your device, or using a different cable or USB port.
2. Use a wireless transfer app. I just used WiFi Album (free version) and it worked great.
3. If you don't need to actually save the video on your computer (but just need to share it), you can also simply upload to YouTube. Lots of sites let you then incorporate the video from YouTube. To do this, click the share icon and choose YouTube. Once it's on YouTube, you can edit, as necessary. You can make the video unlisted, but don't set it to private if your intent is to use it on a website or other project.
Thursday, April 3, 2014
Editing video in the cloud (WeVideo and YouTube)
I recently posted about sharing video. A question that I'm often asked is what tool to use for editing video. Certainly, iMovie is popular on Macs and you can use Windows MovieMaker on PCs. For more sophisticated editing, head over to the media lab (118) and work with Adobe Premiere Elements.
But did you know that you can edit video in the cloud? There are two web-based solutions you should know about. The first is WeVideo. It's completely cloud-based and you can link it to your Google Drive to store and share videos. Check out this quick demo I just made in WeVideo:
Here's an overview from WeVideo
The other web-based tool is the YouTube video editor. It's quite basic, but will allow you to combine videos and do simple editing.

Here's a how-to.
But did you know that you can edit video in the cloud? There are two web-based solutions you should know about. The first is WeVideo. It's completely cloud-based and you can link it to your Google Drive to store and share videos. Check out this quick demo I just made in WeVideo:
Here's an overview from WeVideo
The other web-based tool is the YouTube video editor. It's quite basic, but will allow you to combine videos and do simple editing.
Here's a how-to.
Tuesday, April 1, 2014
Sharing video from your phone or tablet
Frustrated with trying to email video to yourself, only to have it broken up into small clips?
There’s a better way!
Use Google Drive.
Uploading:
- To sign into Drive with your school Google account, see IT to set your password (if you haven’t already). You can also use a personal Google account.
- In the Drive app, click the + sign to upload.
- Choose the video from your Camera Roll.
Sharing:
You can share right from the app, but only with specific people (to do this, click on the grey “i” icon, then Sharing).
If you want to share with “anyone with the link” (which is how I prefer to do it), just hop on a computer, log into Google Drive and do it from there.

Remember-- you can store and share any kind of file in Google Drive. One nice thing about putting video there is that it plays right in the browser (just like YouTube).
Questions? See Charlie in 127 or cmacfadyen@cvuhs.org
Thursday, February 20, 2014
Tools for presenting learning
Students, here are some ideas for tools you can use to present your learning. I wrote it up for a specific class, but thought it might be useful as a general resources. I've given a brief description and pros and cons of each tool. Do you have any other tools that you think should be on this list? Please let me know at cmacfadyen@cvuhs.org
Tech Tools for Presenting Your Learning
Powerpoint.
What it is- set of linked slides
Pros- you probably know how to use it already. It has lots of features to enhance your presentation.
Cons- doesn’t work well with YouTube video.
Google Presentation.
What it is- set of linked slides
Pros- web-based, easy to use. Incorporates YouTube video.
Cons- no sound (other than from video). Not as fully-featured as Powerpoint.
What it is- a canvas with elements that are linked by a path.
Pros- allows for a creative path between elements, including zooming in and out. Has nice templates to start from.
Cons- Not great for lots of text.
What it is- a set of linked slides, but with animated features on each slide.
Pros- Professional looking and engaging. You can control when things appear and disappear from slides.
Cons- Can’t do narration slide-by-slide. Only for the whole presentation.
What it is- use your iPad to record your screen
Pros- record while you draw on the iPad. Can also import images and add text.
Cons- Can’t run other apps while recording.
What it is- a tool for creating timelines.
Pros- you can add multimedia to events on the timeline
Cons- Limited to content that is time-based (dates).
What it is- comic strip creator.
Pros- sophisticated control of the character drawings.
Cons- not the easiest to use. Need parent permission for account unless you’re 19.
What it is- comic strip creator
Pros- Easy to use. Supports multi-languages, including Latin. Comic strips can be printed or e-mailed
Cons- comics cannot be saved, so they need to be done in one shot. Best to have the dialogue written out first, so you can just do the pictures and add in the text.
What it is- online digital poster creator
Pros- Easy to use. Incorporates video and images easily.
Cons- Limited space on poster.
What it is- online video editor
Pros- Nice editor. Easy to use. Make videos from still pictures and video clips
Cons- web-based, so you want decent wifi connection. Can export 15 minutes of video per month with free account
Google Sites
What it is- create a web site with linked pages
Pros- can insert all kinds of content (video, Google Docs, maps, etc)
Cons- Hard to incorporate sound.
PhotoStory (for PC computers)
What it is- upload a series of images and add narration/commentary
Pros- easy to use, can record your voice directly into the app
Cons- No video. Limited functionality.
What it is- like Photostory, except you can put multiple comments on each slide.
Pros- web-based, mutlti-media can draw on screen to highlight while speaking
Cons- Intended more for group conversations than individual presentations.
iMovie (mac computers and iOS)
What it is- movie editor
Pros- It’s already on your mac. Has templates you can use.
Cons- Titles and other elements can be hard to work with. Not easy if you want to do more than use the template.
Windows MovieMaker (PC computers)
What it is- movie editor
Pros- Easy to use
Cons- Limited features.
MonkeyJam (PC computers)
What it is- stop motion animation software
Pros- create animation using legos, clay, etc.
Cons- I don’t know this software well, so…
GarageBand (mac computers)
What it is- audio recorder and editor
Pros- Lots of prerecorded “loops” for background music. Easy to use.
Cons- Interface can be challenging for beginners.
What it is- audio recorder and editor
Pros- free download. Lots of features.
Cons- Need to learn how to work with multiple tracks and importing audio, if needed. No pre-installed “loops” (as in GarageBand)
Wednesday, September 4, 2013
Submitting Video Projects
A question that often comes up from teachers is what's the best way for students to submit video
In an earlier post, I described how students can upload videos to Google Drive, making them easy to
 share.
Here's how you can use Google and Moodle together to make the submission process smooth:
This process has worked well for teachers at CVU. Please let me know if I can help you set this up.
projects-- without using YouTube?
In an earlier post, I described how students can upload videos to Google Drive, making them easy to

Here's how you can use Google and Moodle together to make the submission process smooth:
- Students create the video, upload to Google Drive, then set sharing to "anyone with the link."
- You create an assignment in Moodle (or even a forum, if you want students to see one another's work). All they submit here is the URL (link) to the video in Google Drive.
You now have the links to all the videos in one place. Because it's Moodle, you also know who has (and who has not) submitted. You can also provide feedback via Moodle.
This process has worked well for teachers at CVU. Please let me know if I can help you set this up.
Thursday, May 30, 2013
Summer Opportunities for Teachers
Here are a few opportunities I've noticed for developing tech integration ideas this summer:
RETN is offering a course on harnessing the power of digital video in the classroom (this appeared in the latest Field Memo for the VT Agency of Ed).
Google is offering a free on-line course on Google Earth and Google Maps. It starts June 10th (during exams, unfortunately), but it's self-paced, so you can probably jump in when ready. It goes until June 24th. There are lots of great uses of Google Maps/Earth in the classroom. Here's one example from CVU (look at #2).
Know of others that you want to share? The easiest way to comment is to select "Name/URL" where it says "Comment As:". Then just enter your name (a URL is not necessary).
RETN is offering a course on harnessing the power of digital video in the classroom (this appeared in the latest Field Memo for the VT Agency of Ed).
Google is offering a free on-line course on Google Earth and Google Maps. It starts June 10th (during exams, unfortunately), but it's self-paced, so you can probably jump in when ready. It goes until June 24th. There are lots of great uses of Google Maps/Earth in the classroom. Here's one example from CVU (look at #2).
Know of others that you want to share? The easiest way to comment is to select "Name/URL" where it says "Comment As:". Then just enter your name (a URL is not necessary).
Wednesday, February 6, 2013
Voiceover files in iMovie
I just helped a student who was having trouble with a voiceover not playing in iMovie 11 (voiceovers are the narration recorded directly into iMovie).
We needed to find the actual voiceover file, which turned out to be a bit complicated. Here's the process:
We needed to find the actual voiceover file, which turned out to be a bit complicated. Here's the process:
- Navigate to the iMovie Projects folder.
- Right-click on the particular project and choose "Show Package Contents."
- The voiceover files will now appear (they're .caf files).
Here's a tip-- you can drag the .caf files into GarageBand and edit there.
Sunday, January 27, 2013
Recording and Sharing Video
How can you create and share a video? (updated 3/25/14)
Step 1. Creating your video
- Smartphone (iPhone, Android, iPod Touch, iPad, Android tablet )--If you have a newer device that has a camera facing each direction, open the Camera app, switch so that the camera is recording you. Record the video. It should be a .mov file. Make sure your video is one of the following formats: .wmv, .mov, .flv or mpeg4. If you have the Google Drive app installed on your phone, you can upload the file to Drive. Otherwise, send it to yourself an follow the instructions in Step 2 below.
- Computer WebCam --If you have a webcam on (or connected to) your computer, you can use iMovie (on a Mac) or Windows Movie Maker (on a PC), or WeVideo) to record directly from the webcam. Here’s how to do it on the school “minis”:
- Open Windows Movie Maker Click “Capture From Video Device” (under Capture Video). Click on the USB camera.
- Choose “Internal Microphone” under “Audio Device” and increase the input level (to about 80%). Click Next.
- Name your project. Click Next through the following screens until you get to “Start Capture.”
- Click “Start Capture” to begin recording.
- When you’re done, you will see your recording in Windows Movie Maker. Drag the clip onto the video timeline below. Edit, if necessary.
- Save as a movie (note- this is different than saving the project. Choose the option called “Save to My Computer”).
- If you’re using a Mac at home and you use iMovie, choose Export using Quicktime (Share Menu) to create a .mov file.
- Video Camera
- Record on the camera. Use iMovie (on a Mac), Windows Movie Maker (on a PC), or WeVideo (on the web) to edit. See MovieMaker and iMovie tips above (under computer webcam). Next step...uploading your movie
Step 2. Storing and Playing Video in Google Drive
Did you know that you can upload any kind of file to Google Drive, including video? When you upload video, the video plays right in the browser, just like YouTube. This is a big advantage over having to download it. This video explains how to do it (and is also an example of what it looks like when done):https://docs.google.com/open?id=0B1K_ByAqaFKGamdrajd6WXFUSEs0VHI4eTJHNHpPdw
Here’s how to do it:
- See the previous page for how to record your video. ☞Make sure your video is one of the following formats: .wmv, .mov, .flv or mpeg4. Google accepts other types, as well, but these are the most common.
- Open your Google Drive and click on the Upload icon (next to Create). Choose “File,” browse for your video and upload. Note that the icon for the uploaded video file is different than other types of Google Docs.
- It will take a few minutes (sometimes longer) for your video to be processed. Once it is, you can click on the video and it will play right in the browser.
- Click “Share” ( on the upper right) and you can decide who can see the video: anyone at all, just specific people you name, or anyone who has the link. I usually go with “Anyone with the link,” as you can just post the link or send in an e-mail.
- When people watch your video, they won’t need to download it- instead, it will play in the browser, just like a YouTube video. iMovie- use the Share menu and choose “Quicktime” to save in mov or flv format. Movie Maker- choose “Save to My Computer” under “Finish Movie” (or “Save Movie File” in the File menu).
Monday, November 5, 2012
More Tools for ESL1
Originally posted 9/ 9/ 2012
Looking back on my last post (about ESL 1: Communication), I realize I may have violated the first condition for some folks-- some teachers and students may want to start with something even quicker than shooting and sharing video. Here are some ideas you to try that are easy to set up:
- VoiceThread. Upload a picture or file, give your students the link, and let the conversation begin! At CVU, this has been used in world language classes to discuss famous Spanish paintings, for example. Students can provide text comments, record audio comments, or even use webcams to provide video comments.
- Jing. Jing is a free tool for recording screencasts. Students can record their voices as they capture video of their computer screen. They might explain how they solved a math problem using Geogebra or take the video on a tour of a house they designed in SketchUp.
- Audacity- It's free. It's on all school computers. Record audio, save as mp3. Easy.
Tools for ESL 1
Originally posted 8/26/12
You: OK, Charlie, it's a new year and I want to try something new with technology!
My requirements:
- Easy to do
- Improves student learning
Me: I'm on it-- and I'll even arrange by ESL (our Expectations for Student Learning at CVU HS). Here goes:
ESL 1 Communication
Replace a written response assignment (essay, reflection, answers to questions, math problem, etc.) with an oral one.
Instead of--or in addition to-- having each student present to the class, use technology to capture the response.
Tools

For audio, students can record themselves using computers, handheld digital recorders (see Jacob in 118), or their own smartphones.
For video, students can record themselves using webcams (the mini carts at CVU all have these built in), standard or Flip video cameras (see Jacob in 118), or their smartphones.
It is easiest to minimize the editing needed for this sort of task, so students should strive to get the response in one take. They will find that each successive attempt at the perfect take will improve the quality of the response.
Important- Where students run into the most difficulty is understanding media file types. They may need to use a video or audio editor to convert their recording to the proper format. I'd be happy to come in and explain this to your class.
How do they share the recording with the class/teacher? There are lots of ways to do this. If your students are already blogging (I'll be talking about that when we get to ESL 2- Writing) , they might include the recording in a blog post. Otherwise, an easy way to share is using Google Docs (now called Google Drive). Students can upload their recordings and control the visibility. Here's a how-to (for video).
Subscribe to:
Posts (Atom)