I did a presentation at a recent conference on using Google Sheets and Forms to work with data. I've been in to several math classes helping students learn the basics (and beyond) of the spreadsheet as a tool for analyzing data, exploring patterns, creating graphs, and modeling problems. Here are the slides from my presentation. If there is something in here that you'd like to see in you class, let me know!
Thursday, November 20, 2014


Monday, November 10, 2014
Using PiktoChart in presentation mode
Do you use PiktoChart? I've posted about this great tool for creating infographics. Recently, I learned something new about PiktoChart from a student...
Groups were presenting in my computer programming class. Most used Google presentations or Prezis, but one group surprised me by using PiktoChart. It turns out that there is a now a "Presentation Mode" that shows one block of the infographic at a time in a nice, clean interface. It worked great for the presentation they were doing.
You can try it here (click on Presentation Mode on the upper right):
You can try it here (click on Presentation Mode on the upper right):
Here's how to use Presentation Mode in PiktoChart.
Friday, October 31, 2014
The dreaded "You need permission" in Google docs
We've all had the experience when someone sends you the link to a document, you click to open it, and...

(cue sad trombone music)
If you're a teacher whose students send you links to Google documents, you can avoid this problem by setting up shared folders. I posted last fall about how shared folders work. Once the folder is shared, any document created in that folder (or added to the folder), is automatically shared in the same way.
There are several ways to accomplish this:
- Have students create the folders manually and share them with you.
- Create the folders yourself and share with each student.
- Use a tool like GClassFolders (I used this with class today and it went great) or Doctopus.
The advantage of method #3 is that the folders are all created with a uniform naming convention and placed in a larger folder for ease of access. The teacher is the owner of each folder, with each student being an editor of the appropriate folder.
I'd be happy to help you set this up. It only takes a few minutes!
Monday, October 13, 2014
New tech integration courses
I just got this announcement from Powerful Learning Practices. I've heard good things about their courses. These three start soon...
Glogster, PhotoPeach & Story Bird
Creative 21st Century Lesson Plans
Educational Leadership in the Digital Age
Glogster, PhotoPeach & Story Bird
Creative 21st Century Lesson Plans
Educational Leadership in the Digital Age
Wednesday, September 17, 2014
Saving WeVideo to Google Drive
WeVideo is a great web-based video editor that connects with Google Drive (here's an earlier post about it). Here are some tips on saving (and sharing) videos you create in Google Drive
- Before starting to use WeVideo, go to Google Drive, click Create, then Connect More Apps. Search for WeVideo and add it.
- You can now start a new video project by going to Google Drive, Create, and choosing WeVideo. As you work on WeVideo projects, the project files will be conveniently saved in Google Drive (see the last pic below).
- When you are ready to share your final product…
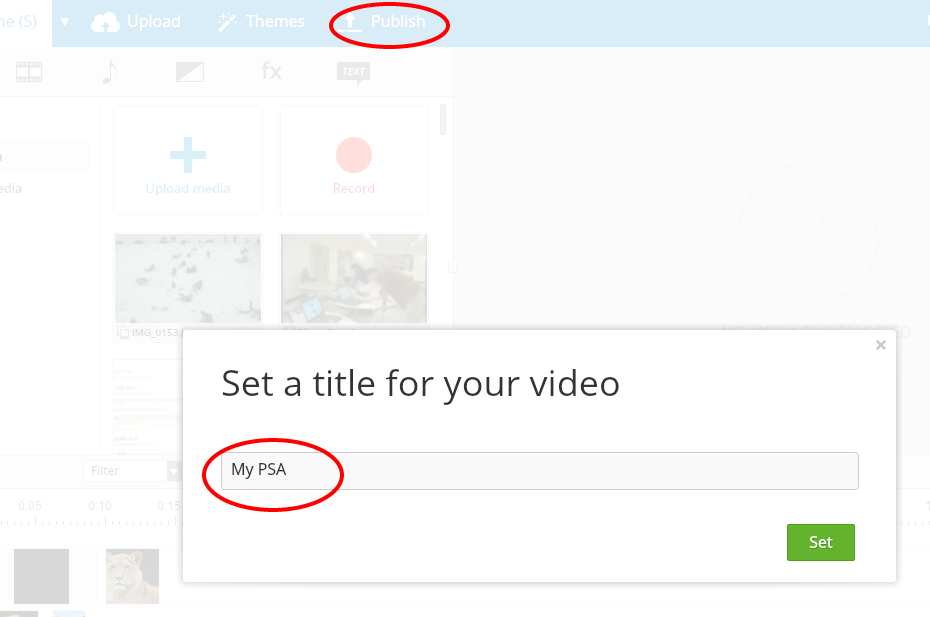
- Click Publish and give it a title.
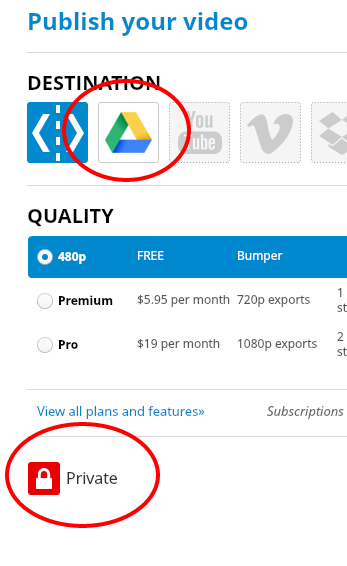
- Click the Google Drive icon. Also, change visibility to private. Publish.
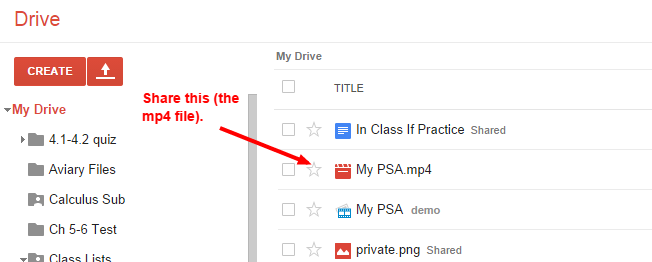
- You will now see the finalized video in your Drive. The format will be mp4. Note that this is different from the project file. Share the video as you would any Google Doc. You will get a URL that you can e-mail, post to Moodle, etc.
Note that you get up to 15 minutes of download time per month. This is usually plenty, but it’s best not to publish until you’re confident that the video is in final form. Note that the other “My PSA” file above (the one that doesn’t say mp4) is the WeVideo project file (that can still be edited).
Subscribe to:
Posts (Atom)