Thursday, September 26, 2013

Getting better results from Google searches

Have you ever found an image from a Google search that ended up being too small for your presentation?  Or an article with too high a reading level?


Next time you do a search, try clicking on the gear icon to the upper right, then clicking Advanced Search.


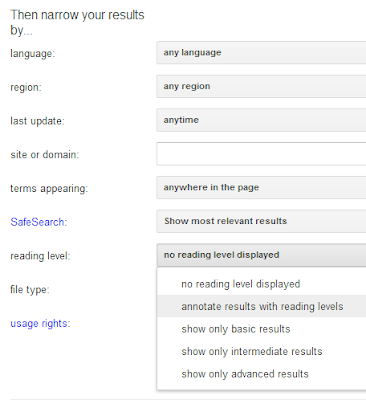
You will get a host of choices that allow you to narrow by various criteria.  For web searches, you'll see this:


Note the ability to filter by reading level, for example.


For image searches, you'll see this:
In this case, the results will be limited to those whose author has allowed re-use.

More information on effective searching is available from our librarians or at the CVU library site.



Thursday, September 12, 2013

Removing/Adding students/colleagues in a Moodle course


Many teachers like to add colleagues as either editing or non-editing teachers.  You may also notice that you occasionally have students in your Moodle classes who have dropped the course. It's a pretty quick process for you to manage enrollments yourself. Here's how:

REMOVING PEOPLE (Including yourself when you are not currently teaching a course):
Click Users...Enrolled Users in the Administration block.
Click on the X to the extreme right of the person you wish to remove (you can also remove yourself from a course you are not currently teaching*).


*Note that only teachers can enroll/unenroll, so if you are a "student" in another teacher's course, that teacher will need to remove you.


ADDING PEOPLE
Click Users...Enrolled Users in the Administration block.

Click on "Enroll Users."

Choose the role (Student, Non-editing teacher, etc.).
Type in the first few letters of the person's name in the search box.
Click Enroll.

Continue with others, as necessary, then click "Finished Enrolling."


Monday, September 9, 2013

Mystery Skype

Have you heard of Mystery Skype?  In their own words, "Mystery Skype is an educational game, invented by teachers, played by two classrooms on Skype. The aim of the game is to guess the location of the other classroom by asking each other questions. It's suitable for all age groups and can be used to teach subjects like geography, history, languages, mathematics and science."


I took a look at classrooms that have signed up in the high school age range and was impressed that there are quite a few!

Check it out here.

Sunday, September 8, 2013

Moodle MOOC

CVU's upgrade to Moodle 2.5 has sparked interest among teachers in doing more with their pages.  There are lots of resources for learning how to do more with Moodle, including http://moodle.org and yours truly.  Now there's a MOOC (massive open online course).  The course actually started Sept 1, but it's not too late to jump in.

Good reasons to try the MOOC:
  1. You'll learn Moodle in an actual Moodle course, giving you the student experience.
  2. You'll get to try a MOOC,  which is a big trend in education (the New York Times called 2012 the "year of the MOOC" and more and more universities-- including Princeton, Stanford, and MIT-- are implementing them).
  3. You'll be interacting with teachers from around the world, developing your PLN (professional learning network).
  4. There's no commitment.  Take as much or little from it as you want.
Here's the kick-off:

Interested?  Check it out at http://learn.moodle.net/

Wednesday, September 4, 2013

Submitting Video Projects

A question that often comes up from teachers is what's the best way for students to submit video
projects-- without using YouTube?  

In an earlier post, I described how students can upload videos to Google Drive, making them easy to
share.

Here's how you can use Google and Moodle together to make the submission process smooth:

  1. Students create the video, upload to Google Drive, then set sharing to "anyone with the link."
  2. You create an assignment in Moodle (or even a forum, if you want students to see one another's work).  All they submit here is the URL (link) to the video in Google Drive.
You now have the links to all the videos in one place.  Because it's Moodle, you also know who has (and who has not) submitted.  You can also provide feedback via Moodle.  

This process has worked well for teachers at CVU.  Please let me know if I can help you set this up.

Sunday, September 1, 2013

Moodle 2 Tips

Here are some more tips for using Moodle 2

  1. Some people who have transferred over lots of resources from Moodle 1 are finding the drag and drop to be irritating when a resource or activity has to be moved a great distance.  Here's a work-around.  If you turn off JavaScript in your browser*, the drag and drop icon will turn into the up/down arrow icon.  This allows you to click on the resource, then click on the destination .  Much faster!
  2. When you create an assignment, you have the choice of on-line text (where students simply write text into the submission box) or file upload.  In Moodle 1, these were separate types of activities.  In any Moodle 2 assignment, you have the choice of either or both.  For example, you may say to students "Either enter your response in the submission box or upload a file containing your response" or "Either paste in the link to your Google Presentation or upload your Powerpoint file."
  3. There is now a cut-off date for assignments.  In the past, teachers struggled with setting due dates for assignments, because once the due date passed, the assignment would either go away (not accepting late submission) or would continue to show up (depending on the setting) as-- for example-- "128 days late."  You can now set both a due date and a "cut-off date."  Assignments can be submitted up to the cut-off date, and will be marked as late.  


*Here's a screencast on how to disable JavaScript...
...and here are the steps (use the Chrome browser for this).
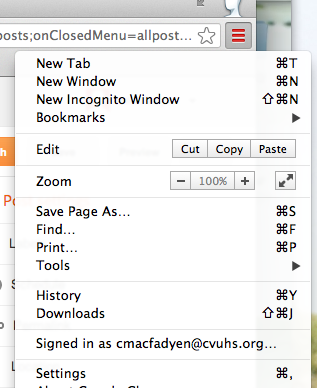
  1. Click on the three horizontal lines icon (or the wrench icon) on the upper right, then Settings.
  2. Scroll to the bottom and choose Advanced Settings.
  3. Under Privacy, click Content, then turn JavaScript off.  Leave this tab open so you can come back and turn JavaScript back on when you're done moving things.
  4. Refresh the Moodle page and you'll see the different move icon (instead of a 4-headed arrow, you'll see up/down arrowheads).